Search

.

Content

0 comments

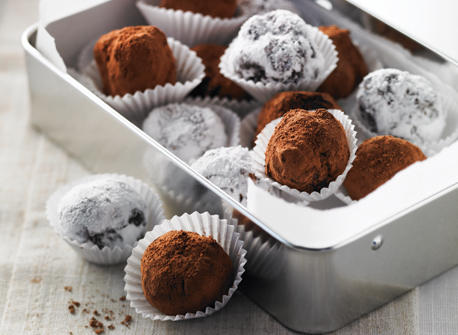
Chocolate Cream Truffles

Source: http://www.dairygoodness.ca/recipes/chocolate-cream-truffles

Yields 36 truffles

Everyone loves truffles! Made with a dark chocolate ganache, as well as cream and fresh butter, these are quick to prepare, yet elegant and refined. For a pretty finish, roll the truffles in cocoa powder or icing sugar. Your guests will find them irresistible!


Ingredients

14 oz (394 g) semisweet or dark chocolate
3/4 cup (175 mL) 35% Cream
2 tbsp (25 mL) unsalted Butter, optional
Sifted cocoa powder, icing sugar

Preparation

Chop chocolate. Combine cream and butter in a small saucepan; bring to a boil over medium heat. Remove cream from heat; add chocolate, stirring until chocolate is melted and smooth.
Cover the mixture and refrigerate for 2 to 3 hours or until firm enough to handle.
Using your fingers, a small melon ball scoop or spoon, shape into small balls. Roll the balls in the cocoa or icing sugar then place on parchment lined baking sheet or tray; cover and refrigerate until firm.
Truffles can be refrigerated for a couple of weeks or frozen for a couple of months.
Read more »
0 comments

The Perfect Chocolate Mousse

Source: http://www.masterchef.com.au/recipes/the-perfect-chocolate-mousse--3-ways.htm

The perfect… Chocolate mousse - 3 ways

George:
Ingredients:
250g (70%) dark chocolate, broken into pieces
¼ cup (60ml) extra virgin olive oil
350ml thickened cream
Pinch smoked salt (optional)

Method: 
1. Place chocolate in a heatproof bowl set over a saucepan of barely simmering water. Stir
occasionally with a metal spoon until melted. Remove from heat, slowly pour oil into bowl with
chocolate, stirring constantly until combined.
2. Meanwhile, whisk cream in a bowl to soft peaks. Gradually pour in chocolate mixture,
whisking to combine. Serve immediately.

Gary:
Ingredients:
½ cup (125ml) water
125g caster sugar
350g (70% cocoa) dark chocolate, broken into pieces
600ml thickened cream
4 egg yolks
2 eggs

Method: 
1. Place water and sugar in a small saucepan and bring to the boil, swirling pan occasionally to
dissolve sugar. Cook for about 5 minutes until the temperature reaches 110°C.
2. Meanwhile, place chocolate in a heatproof bowl set over a saucepan of barely simmering
water. Stir occasionally with a metal spoon until melted.
3. Meanwhile, using an electric mixer fitted with a whisk attachment, whisk cream to soft peaks.
Set aside.
4. Whisk yolks and eggs on high speed for 4 minutes until light and fluffy. With the motor
running, slowly pour in the hot sugar syrup, whisking until the mixture is cool.
5. Fold egg mixture into chocolate until combined, then fold in half the cream until combined,
followed by the remaining cream. Serve immediately.

Matt:
Ingredients:
170g (70% cocoa) dark chocolate, broken into pieces
1/3 (cup) 80ml milk
2 egg yolks
4 egg whites
2 tablespoons caster sugar

Method: 
1. Melt chocolate in a heatproof bowl in a microwave on medium heat for 1 minute. Stir, then
return to microwave in 30 seconds increments until chocolate has completely melted, stirring well
each time.
2. Place milk in a small saucepan over medium heat, and bring to the boil. Gently whisk milk into
chocolate until just combined. Set aside to cool slightly. Gently whisk in egg yolks until just
combined.
3. Meanwhile, using an electric mixer fitted with a whisk attachment, beat egg whites to soft
peaks. Slowly add sugar, beating until stiff and glossy.
4. Fold in one-third of the meringue into chocolate mixture until just combined, then fold in the
remaining meringue until combined.
5. Pour mousse into serving bowl and refrigerate for at least 1 hour before serving.
Read more »
0 comments

Cola Baked Chicken

Source: http://www.masterchef.com.au/recipes/cola-baked-chicken-.htm

Cola baked chicken

Ingredients:
750ml cola
1 cup firmly packed brown sugar
3 cloves garlic, grated
1 large brown onion, grated
2 tablespoons soy sauce
1kg chicken wings, cut at the joints
Juice of one lemon

Method:
1. Preheat oven to 140°C fan forced.
2. Combine cola, sugar, garlic, onion and soy in a bowl.
3. Arrange chicken wings in a single layer in a deep oven tray and pour over cola mixture.
4. Bake for 3-3.5 hours or until sauce is thick and very sticky.
Read more »
0 comments

Matt Prestons Soup

Source: http://www.masterchef.com.au/recipes/matt-prestons-soup.htm

Matt Prestons Soup

Ingredients:
440g can baked beans
50ml pure cream
150ml milk
Finely grated zest of 1 orange
Roasted whole coriander seeds, to serve
Extra virgin olive oil, to drizzle

Method:
1. Heat baked beans in a saucepan until hot then and puree with a stick blender until smooth. Add
cream and milk and puree until soup has reached your desired consistency.
2. Serve topped with orange rind, coriander seeds and a drizzle of oil to garnish.
Read more »
0 comments

P. F. Chang's Mongolian Beef

Source: http://www.food.com/recipe/p-f-changs-mongolian-beef-66121

P. F. Chang's Mongolian Beef. Photo by Caroline Cooks

Total Time: 30 mins
Prep Time: 10 mins 
Cook Time: 20 mins 

Ingredients:
2 teaspoons vegetable oil
1/2 teaspoon ginger, minced
1 tablespoon garlic, chopped
1/2 cup soy sauce
1/2 cup water
3/4 cup dark brown sugar
vegetable oil, for frying (about 1 cup)
1 lb flank steak
1/4 cup cornstarch
2 large green onions, sliced on the diagonal into one-inch lengths

Method: 

1. Make the sauce by heating 2 tsp of vegetable oil in a medium saucepan over med/low heat.
2. Don't get the oil too hot.
3. Add ginger and garlic to the pan and quickly add the soy sauce and water before the garlic scorches.
4. Dissolve the brown sugar in the sauce, then raise the heat to about medium and boil the sauce for 2-3 minutes or until the sauce thickens.
5. Remove it from the heat.
6. Slice the flank steak against the grain into 1/4" thick bite-size slices (Tilt the blade of your knife at about a forty five degree angle to the top of the steak so that you get wider cuts).
7. Dip the steak pieces into the cornstarch to apply a very thin dusting to both sides of each piece of beef.
8. Let the beef sit for about 10 minutes so that the cornstarch sticks.
9. As the beef sits, heat up one cup of oil in a wok (you may also use a skillet for this step as long as the beef will be mostly covered with oil).
10. Heat the oil over medium heat until it's nice and hot, but not smoking.
11. Add the beef to the oil and sauté for just two minutes, or until the beef just begins to darken on the edges.
12. You don't need a thorough cooking here since the beef is going to go back on the heat later.
13. Stir the meat around a little so that it cooks evenly.
14. After a couple minutes, use a large slotted spoon to take the meat out and onto paper towels, then pour the oil out of the wok or skillet.
15. Put the pan back over the heat, dump the meat back into it and simmer for one minute.
16. Add the sauce, cook for one minute while stirring, then add all the green onions.
17. Cook for one more minute, then remove the beef and onions with tongs or a slotted spoon to a serving plate.
18. Leave the excess sauce behind in the pan.
Read more »
0 comments

Apple pie

One of his favourites, is the apple pie. The previous place we stayed didn't have an oven, or shd i say there was but I feel bad using it cos is not our place. So never tried it until we shifted to Gosnells. It is yum.

Source: https://www.taste.com.au/recipes/apple-pie/0d52b417-4318-43b6-9974-79f0b0531b48

Ingredients: 

  • 1 3/4 cups (260g) plain flour, plus extra for dusting
  • 1/2 cup (75g) self-raising flour
  • 185g unsalted butter, chilled, cut into small pieces
  • 1/3 cup (75g) caster sugar
  • 2 eggs
  • 1 tablespoon chilled water
  • 1 tablespoon milk
  • Demerara sugar or caster sugar, to sprinkle
  • Ice-cream, to serve

FILLING

  • 45g unsalted butter
  • 1/2 cup (110g) caster sugar
  • 8 large Granny Smith apples 
  • Juice of 1 lemon
  • 1/4 teaspoon Ground Cloves
  • 1 teaspoon ground cinnamon
Instructions: 

  • Step 1
    Sift flours and a pinch of salt into a large mixing bowl. Add butter and rub lightly into flour with your fingertips. Lift mixture high above the bowl as you rub, to incorporate air into the pastry and make it lighter. Continue until mixture resembles fine breadcrumbs, then stir through sugar. Lightly beat 1 egg with 1 tablespoon chilled water, then drizzle over flour mixture. Start to bring the dough together by cutting the liquid into the dough with a blunt knife, then form into a smooth ball with your hands, adding a little more water if necessary. Divide dough into two pieces, one slightly larger than the other. Wrap in plastic wrap, and chill for 30 minutes.
  • Step 2
    To make the filling, peel and core the apples, and cut each into 8 pieces. Toss immediately with lemon juice in a large bowl, to prevent apples from discolouring. Place the butter and sugar in a large frypan over medium-low heat. When butter has melted, add apples and spices, then stir to coat. Cook, stirring occasionally, for 10 minutes or until apples have softened. Set aside to cool.
  • Step 3
    Roll out the larger pastry ball on a floured workbench to a 30cm circle (about 2mm thick). Roll pastry around rolling pin, then unroll over a 22cm metal pie dish. Gently press into corners and allow excess to overhang. Place filling in base with a slotted spoon. Roll the small pastry piece to a 25cm circle. Beat remaining egg with milk, brushing some on rim of the base. Top with small pastry.
  • Step 4
    Lift the pie dish and cut excess pastry from edges with a sharp knife. Crimp edges of pastry together the tail of a spoon. Chill for 30 minutes. Preheat oven to 180C, place pie dish on a baking tray and cut air vents in the centre of the pie. Brush top of pie with more beaten egg, sprinkle with demerara or caster sugar and bake for 45 minutes or until golden brown.
  • Step 5
    Serve warm or cold with ice-cream.
Updated with picture: June 2019

My kids enjoy helping to make amd they love to eat it too! Enjoy! 😊

Read more »
0 comments

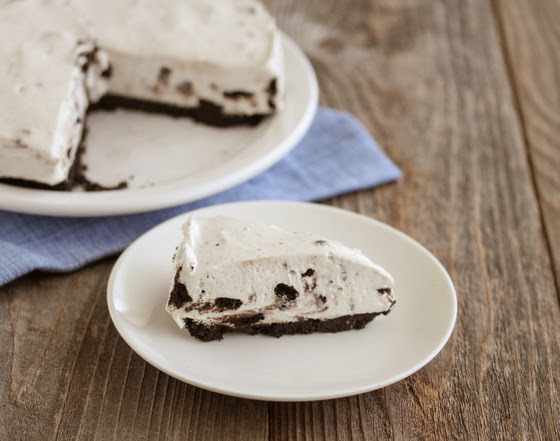
Non Bake Oreo Cheesecake

One of my all time favorite. 

Source: http://www.yummly.com/recipe/external/Philadelphia_oreo-No_bake-Cheesecake-Allrecipes
http://www.snackworks.com/recipe/oreo-no-bake-cheesecake-105197.aspx

"On a chocolate cookie base, this easy no-bake cheesecake is filled with more chopped cookies for a winning taste combination." —  

OREO No-Bake Cheesecake Recipe
  • 15 min prep
  • 4 hr  15 min total
  • Makes 16 servings.

    INGREDIENTS: 
  • 36 pkg. OREO Cookies, divided
  • 1/4 cup butter, melted
  • 4 pkg. (8 oz. each) brick cream cheese, softened
  • 3/4 cup sugar
  • 1 tsp. vanilla
  • 1 tub (8 oz.) COOL WHIP Whipped Topping, thawed


INSTRUCTIONS:


  • CHOP  15 cookies coarsely. Finely crush remaining cookies; mix with butter. Press onto bottom of 13x9-inch pan. Refrigerate while preparing filling.
  • BEAT  cream cheese, sugar and vanilla in large bowl with mixer until well blended. Gently stir in COOL WHIP and chopped cookies; spread onto crust.
  • REFRIGERATE  4 hours or until firm.


A healthier version:

http://kirbiecravings.com/2013/07/no-bake-oreo-cheesecake-2.html


ingredients:

For the crust:
13 oreos
4 tbsp melted butter
For the cheesecake:
6 Oreos
2 boxes cream cheese (8 oz boxes)
1 1/4 cup granulated sugar
1 1/2 cups lowfat plain Greek yogurt (if you want a very solid cheesecake, use heavy cream instead and beat heavy cream separately first until stiff peeks form and then beat with sugar and cream cheese)

directions:

1. Line the bottom of a 6 inch springform pan with parchment paper. This will make it easier to remove the cheesecake after it is done. 
2. Crush the 13 Oreos in a food processor until fine crumbs. Add in melted butter and mix again through food processor. Pour into cake pan and press down firmly so that the crust evenly lines the bottom of the cake pan.
3. Mix cream cheese, yogurt, and sugar in stand mixer on high speed until smooth and fluffy. Add in Oreos and mix in at low speed until Oreos are crushed and evenly mixed in batter. 
4. Pour batter into cake pan on top of crust. Rap bottom of the cake pan on hard surface a few times until cheesecake mixture settles and top is smooth. 
5. Refrigerate overnight.
Read more »
0 comments

Sweet and Sour Pork

Source: http://chinesefood.about.com/od/pork/r/sweetsourpork.htm

Recipe good for chicken or fish. The sauce is also great for dipping spring rolls in.


Serves 4
Preparation time: more than 30 minutes

500g pork fillet, cut into 2 cm cubes

Batter:
1/2 cup plain flour
1/4 cup cornflour
1/2 cup cold water
1 egg
1/4 teaspoon salt

Oil, for deep frying

Sauce: 
1 red capsicum, cut in 2 cm pieces
1 onion, halved and sliced lengthways
1 carrot, sliced and cooked
1 x 300 g tin pineapple pieces, 2 tablespoons juice reserved
3 tablespoons oil
1/2 cup sugar or 1/4 cup sugar
2 tablespoons soy sauce
2 tablespoons vinegar
1/2 cup tomato sauce
1 tablespoon cornflour
1 cup water

Method: 
1. Sauce: Heat oil and saute chopped vegetables for 5 minutes.
2. Mix sugar, soy sauce, pineapple juice, vinegar and tomato sauce together then to the vegetables. Add the pineapples pieces and bring to the boil.
3. Once the sauce is boiling, add the cornflour which has been blended with the water.
4. Continue stirring until mixture boils and thickens.
5. Keep hot while preparing pork. Heat oil for deep-frying pork.
6. Whisk batter ingredients together until smooth. Add pork and stir to coat well.
7. Fry pork in batches until cooked, about 4-5 minutes. Drain on paper towels and keep warm while cooking the rest of the pork.
8. Once the pork is cooked, serve with the sauce, and some plain rice.


Read more »
0 comments

Mini Prawn Rolls 2

Source: http://adel-icious.blogspot.sg/2012/06/spicy-dried-shrimp-aka-hay-bee-hiam.html

Spicy Dried Shrimp
 200g     Dried Shrimp (weight is before soaking)
   20g     Garlic, minced (about 5-6 cloves)
 200g     Chilli Paste
Salt & Sugar to taste

Doesn't matter if the chilli paste is home made or store bought although there's always greater control in home made items. Some recipes call it "Sambal", works for me but if you're unfamiliar with it, it's just a chilli paste.

1. Soak the Dried Shrimps for about 20-30 minutes, dry the shrimps as much as you can and have it coarsely minced for chunky style so you will get the occasional burst of shrimpy goodness when eating.
2.  Heat a tablespoon of oil over Medium heat and sautéed garlic till fragrant. Add in the minced shrimp and continue frying till the whole kitchen is filled with the aroma of fried shrimp. The minced shrimp will shrivel slightly and darken in colour. Another tell-tale sign is that some of the smaller pieces will start jumping about the wok.

3. Add in the Chilli Paste, mix with the minced shrimp and keep the mixture moving constantly to prevent burning (I burnt mine a little as I tried to take pictures... -.-). Season to taste. Like every other time, the chilli will assault your eyes and nose. Keep your kitchen well-ventilated at this stage. Heat off when most moisture has been removed.

4. Cool completely before storing in a sterilized container.

Spicy Dried Shrimp Rolls (makes about 40 mini rolls)
200g     Spicy Dried Shrimps
   5       Spring Roll Skin, each cut into 9 squares
   1       Egg, lightly beaten 
1. Place a small amount of Spicy Dried Shrimps in the center of a small spring roll skin. Fold the bottom -> right -> left corners toward the center. Dab a little egg wash in the middle and the last corner before completing the roll.
2. Deep fry in Medium heat oil till golden brown OR "fry" them in an Air Fryer at 180º C for 10 minutes, checking and shaking the basket halfway. 


Read more »
0 comments

Mini Prawns Rolls

Source: http://tamarindandthyme.wordpress.com/2010/02/06/mini-spicy-shrimp-rolls/

Mini Spicy Shrimp Rolls

Mini Spicy Shrimp Rolls
makes 150-200.
100g dried shrimp
8 large dried chilies
5 shallots
4 cloves garlic
3 tbsps sunflower oil
1-1.5 tsp salt, to taste
1-1.5 tbsp sugar, to taste
1 packet of large, square spring roll wrappers (I didn’t use the largest ones; I used the next largest that come 40 to a pack, Spring Home brand)
1 egg, beaten
sunflower oil for frying
Soak the dried shrimps in cold water for 15 minutes. Place into a mini chopper or food processor and process until finely chopped. Set aside.
Peel the shallots and chop finely (I used my mini chopper). Set aside. Peel the garlic cloves and chop finely too.
Soak the dried chilies in warm water until soft. Cut into large pieces, discarding the seeds, and blend with a little water until a paste is formed.
Ingredients for the Filling
Heat a frying pan over medium heat and when hot, add the 3 tbsps sunflower oil. Fry the chopped shallots for a few minutes until soft. Add the garlic and fry until it’s fragrant. Stir through the chili paste, letting it cook until much of the liquid has dried up. Add all the processed dried shrimp and continue frying, stirring continuously until the mixture goes quite dry and dark. I didn’t time how long this took but I was frying there for at least 10-15 minutes or so, I think. When done, set it aside and let it cool.
If your spring roll wrappers were frozen, defrost them. Separate them carefully and cut each wrapper into 9 smaller squares. Stack these smaller squares to prevent them from drying out.
Now to wrap them! You might want to get comfortable for this; I was wrapping for a few hours. Place a little less than a teaspoonful of the shrimp mixture on the wrapper and wrap as you would a regular spring roll. (Sorry, no photos of this process but this postillustrates the steps quite nicely). Use a tiny dab of beaten egg at the final point to seal the roll. Repeat until you’re out of wrappers or out of filling (that was me) or out of patience.
All Wrapped
To fry them, heat about 2 cm of sunflower oil in a pot or pan on medium-high heat. When you add a roll, the oil should bubble up around it. Fry for about 2 minutes until the roll is golden. Drain well on kitchen paper. Fry all the rolls in not too large batches (don’t want that oil to cool down).
Frying
Make sure the rolls have cooled fully before packing them in an airtight container.


Read more »
0 comments

Interesting. Cheesecloth / Muslin / Nappy cloth?

Source: http://www.theprairiehomestead.com/2011/04/a-frugal-cheesecloth-alternative.html

It’s funny to think that merely 2 years ago, I didn’t even know what cheesecloth was, let alone have a need for it.
However, now that my kitchen has been transformed into a real food workshop, I find myself needing all sorts of “weird” items.
Cheesecloth has many uses. Most commonly it’s used in various forms of cheesemaking (duh), but it also works great as a strainer for broth, jellies, or soft cheeses like yogurt or kefir cheese.
If you walk into your run-of-the-mill store asking for cheesecloth, the clerk will scratch his head and then most likely send you to the hardware department where they will point you to a poor, gauze-like, excuse for the stuff. Don’t be tempted, it doesn’t work! The “fabric” is flimsy and the holes are too big. It’s not really designed for kitchen use.
The other option is to find a high-end kitchen supply store, as they sometimes carry it. (But not Bed, Bath, and Beyond. Been there, done that…)
OR, my solution to this problem?
Go grab a package of diapers.
Wait a second. Crinkly, disposable diapers are probably the first thing that came to your mind, right?
You know, the cheapie ones that create a big, leaky mess if you use them on your baby? Well, they make horrible diapers, but perfect cheesecloth!
Really, all they are is a big ol’ linen-style napkin. They aren’t fuzzy, so you don’t have to worry about fabric bits ending up in your cheese.
But, if you do decide to go this route, make sure you buy a package specifically for kitchen use and mark them with a Sharpie.
Lemme say that one more time: Do not, I repeat, DO NOT use these interchangeably on your baby and cheese.
That.would.be.gross.
Thankfully, I use the high-tech version of cloth dipes on Prairie Baby (look for a future post on that, by the way!), so I don’t have to worry about any confusion.
I’ve used this technique for all sorts of cheese projects, and it’s worked great. Maybe someday I’ll get around to ordering some real, official cheesecloth from Cultures for Health, but for now, I’m happy with my diapers!

Fresh out of diapers? Try these alternatives instead!

  • Muslin fabric
  • A clean pillowcase
  • A clean sheet
  • A tea towel
Do you ever use cheesecloth in your kitchen? Do you use the ‘real’ stuff, or a creative alternative?
- See more at: http://www.theprairiehomestead.com/2011/04/a-frugal-cheesecloth-alternative.html#sthash.91W5WTKC.dpuf
Read more »
0 comments

Matcha Green Tea Cookies

Source: http://japanesefood.about.com/od/japanesedessertsweet/r/greenteacookie.htm

Matcha Flavored Cookies
Matcha (green tea powder) can add great flavor and color to many sweets. When you want to make green cookies, try making matcha flacored cookies.

Ingredients:

  • 1 cup butter
  • 3/4 cup sugar
  • 1/2 large egg, beaten
  • 1 Tbsp matcha green tea powder
  • 2 1/2 cup flour

Preparation:

1. Cream butter in a large bowl. 
2. Add sugar and mix well. 
3. Next, add egg and mix well. 
4. Sift flour and green tea powder together. 
5. Add it in the dough and mix lightly. 
6. Wrap the dough with plastic wrap and refrigerate for about 30 minutes. 
7. Preheat the oven to 340 degrees F/ 171 degrees Celsius.
8. Roll the dough on floured board into 1/4 inch thick and cut out cookies. 
9. Place cookies on a lined baking pan. Bake cookies in the oven for about 10-15 minutes.
Review and variation:  
1. Use self raising flour instead of plain flour in this recipe because I prefer softer cookies to hard ones and the cookies turned out great! 
2. Use 2 tablespoons of matcha powder instead of 1. 
---------------------------------------------------------------------------------------------
Ingredients: 
2 cups bleached all purpose flour
1 -2 tablespoon green tea powder (matcha -- See Note 1)
1/2 teaspoon salt
1 cup butter (unsalted at room temperature -- See Note 2)
1/2 cup powdered sugar (more if your tea is very intense)

Directions:
1. Sift the flour, powdered tea and salt into a bowl.
2. In a mixer bowl, beat butter and powdered sugar until fluffy.
3. Add flour mixture to mixer bowl and mix slowly until dough just comes together.
4. Pull dough together carefully in a log, approximately 2 inches in diameter.
5. Wrap dough log and place in freezer for 30 minutes or until dough has firmed to the touch.
6. Slice dough into 1/4 inch rounds and place on a parchment or Silpat lined cookie sheet, approximately 1 inch apart.
7. Bake in a preheated 325 degree F / 162 degree Celsius oven for 16 to 18 minutes (or until the cookies are just starting to turn golden around the edges), turning the pan halfway through the baking time.
8. Remove cookies immediately from the cookie sheet and cool on a wire rack.
9. Store in an airtight container or wrap well and freeze.
10. The well-chilled cookie dough can also be rolled out and cut into desired shapes before baking.
11. NOTE 1-- powdered green tea is not merely green tea that has been pulverized in a food processor or food mill, it's a special kind of tea that has been prepared to dissolve nicely.
12. NOTE 2-- don't use the microwave to soften the butter, room temperature butter is the correct consistency for this recipe.
Read more »
0 comments

How To Cook That - Despicable Me 2 3D Minion Cake by Ann Reardon

A friend shared this in the group chat. Found it really interesting. I don't think I have the patience to do that yet. Still quite pleased with my char siew bao. keke


http://youtu.be/fkIMdzRvsfQ
Read more »