Search

.

Content

0 comments

Sweet and Sour Pork

Source: http://chinesefood.about.com/od/pork/r/sweetsourpork.htm

Recipe good for chicken or fish. The sauce is also great for dipping spring rolls in.


Serves 4
Preparation time: more than 30 minutes

500g pork fillet, cut into 2 cm cubes

Batter:
1/2 cup plain flour
1/4 cup cornflour
1/2 cup cold water
1 egg
1/4 teaspoon salt

Oil, for deep frying

Sauce: 
1 red capsicum, cut in 2 cm pieces
1 onion, halved and sliced lengthways
1 carrot, sliced and cooked
1 x 300 g tin pineapple pieces, 2 tablespoons juice reserved
3 tablespoons oil
1/2 cup sugar or 1/4 cup sugar
2 tablespoons soy sauce
2 tablespoons vinegar
1/2 cup tomato sauce
1 tablespoon cornflour
1 cup water

Method: 
1. Sauce: Heat oil and saute chopped vegetables for 5 minutes.
2. Mix sugar, soy sauce, pineapple juice, vinegar and tomato sauce together then to the vegetables. Add the pineapples pieces and bring to the boil.
3. Once the sauce is boiling, add the cornflour which has been blended with the water.
4. Continue stirring until mixture boils and thickens.
5. Keep hot while preparing pork. Heat oil for deep-frying pork.
6. Whisk batter ingredients together until smooth. Add pork and stir to coat well.
7. Fry pork in batches until cooked, about 4-5 minutes. Drain on paper towels and keep warm while cooking the rest of the pork.
8. Once the pork is cooked, serve with the sauce, and some plain rice.




Read more »
0 comments

Mini Prawn Rolls 2

Source: http://adel-icious.blogspot.sg/2012/06/spicy-dried-shrimp-aka-hay-bee-hiam.html

Spicy Dried Shrimp
 200g     Dried Shrimp (weight is before soaking)
   20g     Garlic, minced (about 5-6 cloves)
 200g     Chilli Paste
Salt & Sugar to taste

Doesn't matter if the chilli paste is home made or store bought although there's always greater control in home made items. Some recipes call it "Sambal", works for me but if you're unfamiliar with it, it's just a chilli paste.

1. Soak the Dried Shrimps for about 20-30 minutes, dry the shrimps as much as you can and have it coarsely minced for chunky style so you will get the occasional burst of shrimpy goodness when eating.
2.  Heat a tablespoon of oil over Medium heat and sautéed garlic till fragrant. Add in the minced shrimp and continue frying till the whole kitchen is filled with the aroma of fried shrimp. The minced shrimp will shrivel slightly and darken in colour. Another tell-tale sign is that some of the smaller pieces will start jumping about the wok.

3. Add in the Chilli Paste, mix with the minced shrimp and keep the mixture moving constantly to prevent burning (I burnt mine a little as I tried to take pictures... -.-). Season to taste. Like every other time, the chilli will assault your eyes and nose. Keep your kitchen well-ventilated at this stage. Heat off when most moisture has been removed.

4. Cool completely before storing in a sterilized container.

Spicy Dried Shrimp Rolls (makes about 40 mini rolls)
200g     Spicy Dried Shrimps
   5       Spring Roll Skin, each cut into 9 squares
   1       Egg, lightly beaten 
1. Place a small amount of Spicy Dried Shrimps in the center of a small spring roll skin. Fold the bottom -> right -> left corners toward the center. Dab a little egg wash in the middle and the last corner before completing the roll.
2. Deep fry in Medium heat oil till golden brown OR "fry" them in an Air Fryer at 180º C for 10 minutes, checking and shaking the basket halfway. 


Read more »
0 comments

Mini Prawns Rolls

Source: http://tamarindandthyme.wordpress.com/2010/02/06/mini-spicy-shrimp-rolls/

Mini Spicy Shrimp Rolls

Mini Spicy Shrimp Rolls
makes 150-200.
100g dried shrimp
8 large dried chilies
5 shallots
4 cloves garlic
3 tbsps sunflower oil
1-1.5 tsp salt, to taste
1-1.5 tbsp sugar, to taste
1 packet of large, square spring roll wrappers (I didn’t use the largest ones; I used the next largest that come 40 to a pack, Spring Home brand)
1 egg, beaten
sunflower oil for frying
Soak the dried shrimps in cold water for 15 minutes. Place into a mini chopper or food processor and process until finely chopped. Set aside.
Peel the shallots and chop finely (I used my mini chopper). Set aside. Peel the garlic cloves and chop finely too.
Soak the dried chilies in warm water until soft. Cut into large pieces, discarding the seeds, and blend with a little water until a paste is formed.
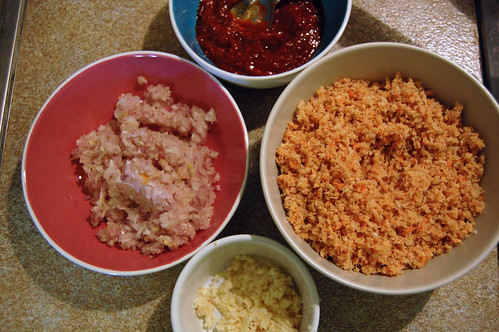
Ingredients for the Filling
Heat a frying pan over medium heat and when hot, add the 3 tbsps sunflower oil. Fry the chopped shallots for a few minutes until soft. Add the garlic and fry until it’s fragrant. Stir through the chili paste, letting it cook until much of the liquid has dried up. Add all the processed dried shrimp and continue frying, stirring continuously until the mixture goes quite dry and dark. I didn’t time how long this took but I was frying there for at least 10-15 minutes or so, I think. When done, set it aside and let it cool.
If your spring roll wrappers were frozen, defrost them. Separate them carefully and cut each wrapper into 9 smaller squares. Stack these smaller squares to prevent them from drying out.
Now to wrap them! You might want to get comfortable for this; I was wrapping for a few hours. Place a little less than a teaspoonful of the shrimp mixture on the wrapper and wrap as you would a regular spring roll. (Sorry, no photos of this process but this postillustrates the steps quite nicely). Use a tiny dab of beaten egg at the final point to seal the roll. Repeat until you’re out of wrappers or out of filling (that was me) or out of patience.
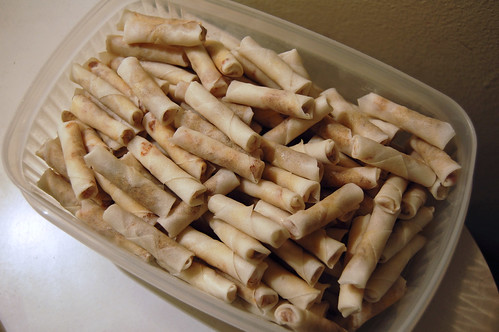
All Wrapped
To fry them, heat about 2 cm of sunflower oil in a pot or pan on medium-high heat. When you add a roll, the oil should bubble up around it. Fry for about 2 minutes until the roll is golden. Drain well on kitchen paper. Fry all the rolls in not too large batches (don’t want that oil to cool down).
Frying
Make sure the rolls have cooled fully before packing them in an airtight container.


Read more »
0 comments

Interesting. Cheesecloth / Muslin / Nappy cloth?

Source: http://www.theprairiehomestead.com/2011/04/a-frugal-cheesecloth-alternative.html

It’s funny to think that merely 2 years ago, I didn’t even know what cheesecloth was, let alone have a need for it.
However, now that my kitchen has been transformed into a real food workshop, I find myself needing all sorts of “weird” items.
Cheesecloth has many uses. Most commonly it’s used in various forms of cheesemaking (duh), but it also works great as a strainer for broth, jellies, or soft cheeses like yogurt or kefir cheese.
If you walk into your run-of-the-mill store asking for cheesecloth, the clerk will scratch his head and then most likely send you to the hardware department where they will point you to a poor, gauze-like, excuse for the stuff. Don’t be tempted, it doesn’t work! The “fabric” is flimsy and the holes are too big. It’s not really designed for kitchen use.
The other option is to find a high-end kitchen supply store, as they sometimes carry it. (But not Bed, Bath, and Beyond. Been there, done that…)
ORmy solution to this problem?
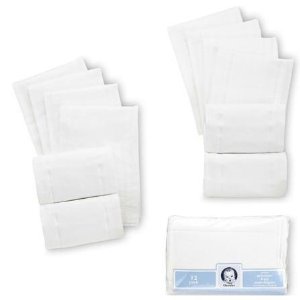
Go grab a package of diapers.
Wait a second. Crinkly, disposable diapers are probably the first thing that came to your mind, right?
You know, the cheapie ones that create a big, leaky mess if you use them on your baby? Well, they make horrible diapers, but perfect cheesecloth!
Really, all they are is a big ol’ linen-style napkin. They aren’t fuzzy, so you don’t have to worry about fabric bits ending up in your cheese.
But, if you do decide to go this route, make sure you buy a package specifically for kitchen use and mark them with a Sharpie.
Lemme say that one more time: Do not, I repeat, DO NOT use these interchangeably on your baby and cheese.
That.would.be.gross.
Thankfully, I use the high-tech version of cloth dipes on Prairie Baby (look for a future post on that, by the way!), so I don’t have to worry about any confusion.
I’ve used this technique for all sorts of cheese projects, and it’s worked great. Maybe someday I’ll get around to ordering some real, official cheesecloth from Cultures for Health, but for now, I’m happy with my diapers!

Fresh out of diapers? Try these alternatives instead!

  • Muslin fabric
  • A clean pillowcase
  • A clean sheet
  • A tea towel
Do you ever use cheesecloth in your kitchen? Do you use the ‘real’ stuff, or a creative alternative?
- See more at: http://www.theprairiehomestead.com/2011/04/a-frugal-cheesecloth-alternative.html#sthash.91W5WTKC.dpuf
Read more »
0 comments

Matcha Green Tea Cookies

Source: http://japanesefood.about.com/od/japanesedessertsweet/r/greenteacookie.htm

Matcha Flavored Cookies
Matcha (green tea powder) can add great flavor and color to many sweets. When you want to make green cookies, try making matcha flacored cookies.

Ingredients:

  • 1 cup butter
  • 3/4 cup sugar
  • 1/2 large egg, beaten
  • 1 Tbsp matcha green tea powder
  • 2 1/2 cup flour

Preparation:

1. Cream butter in a large bowl. 
2. Add sugar and mix well. 
3. Next, add egg and mix well. 
4. Sift flour and green tea powder together. 
5. Add it in the dough and mix lightly. 
6. Wrap the dough with plastic wrap and refrigerate for about 30 minutes. 
7. Preheat the oven to 340 degrees F/ 171 degrees Celsius.
8. Roll the dough on floured board into 1/4 inch thick and cut out cookies. 
9. Place cookies on a lined baking pan. Bake cookies in the oven for about 10-15 minutes.
Review and variation:  
1. Use self raising flour instead of plain flour in this recipe because I prefer softer cookies to hard ones and the cookies turned out great! 
2. Use 2 tablespoons of matcha powder instead of 1. 
---------------------------------------------------------------------------------------------
Ingredients: 
2 cups bleached all purpose flour
1 -2 tablespoon green tea powder (matcha -- See Note 1)
1/2 teaspoon salt
1 cup butter (unsalted at room temperature -- See Note 2)
1/2 cup powdered sugar (more if your tea is very intense)

Directions:
1. Sift the flour, powdered tea and salt into a bowl.
2. In a mixer bowl, beat butter and powdered sugar until fluffy.
3. Add flour mixture to mixer bowl and mix slowly until dough just comes together.
4. Pull dough together carefully in a log, approximately 2 inches in diameter.
5. Wrap dough log and place in freezer for 30 minutes or until dough has firmed to the touch.
6. Slice dough into 1/4 inch rounds and place on a parchment or Silpat lined cookie sheet, approximately 1 inch apart.
7. Bake in a preheated 325 degree F / 162 degree Celsius oven for 16 to 18 minutes (or until the cookies are just starting to turn golden around the edges), turning the pan halfway through the baking time.
8. Remove cookies immediately from the cookie sheet and cool on a wire rack.
9. Store in an airtight container or wrap well and freeze.
10. The well-chilled cookie dough can also be rolled out and cut into desired shapes before baking.
11. NOTE 1-- powdered green tea is not merely green tea that has been pulverized in a food processor or food mill, it's a special kind of tea that has been prepared to dissolve nicely.
12. NOTE 2-- don't use the microwave to soften the butter, room temperature butter is the correct consistency for this recipe.
Read more »
0 comments

How To Cook That - Despicable Me 2 3D Minion Cake by Ann Reardon

A friend shared this in the group chat. Found it really interesting. I don't think I have the patience to do that yet. Still quite pleased with my char siew bao. keke


http://youtu.be/fkIMdzRvsfQ
Read more »
0 comments

Why You Should Not Use Laptop Over The Legs

I'm guilty of this.
Read more »
0 comments

Exercises To Reduce Lower Back Pain

Read more »
0 comments

Why We Should Not Eat Instant Noodles

Read more »
0 comments

Uses of Garlic

Photo: health Benefit of Garlic~ Now a days peoples are more concious to Natural health and their benefits....lets know about Garlic and its natural benefit.....

Subscribe Here to get Daily Health Tips - http://mht.co.in/Subscribe-here
Read more »
0 comments

Uses of Lemon Juice

Photo: Uses of Lemon Juice ~
Read more »
0 comments

Banana

Just read this article. Interesting facts about banana.

Source:

BANANA -Very interesting FACTS

Never, put your banana in the refrigerator!!!­...
This is interesting. After reading this, you'll never look at a banana in the same way again.

Bananas contain three natural sugars - sucrose, fructose and glucose combined with fiber. A banana gives an instant, sustained and substantial boost of energy.

Research has proven that just two bananas provide enough energy for a strenuous 90-minute workout. No wonder the banana is the number one fruit with the world's leading athletes.

But energy isn't the only way a banana can help us keep fit. It can also help overcome or prevent a substantial number of illnesses and conditions, making it a must to add to our daily diet.

DEPRESSION:
According to a recent survey undertaken by MIND amongst people suffering from depression, many felt much better after eating a banana. This is because bananas contain tryptophan, a type of protein that the body converts into serotonin, known to make you relax, improve your mood and generally make you feel happier.

PMS:
Forget the pills - eat a banana. The vitamin B6 it contains regulates blood glucose levels, which can affect your mood.

ANEMIA:
High in iron, bananas can stimulate the production of hemoglobin in the blood and so helps in cases of anemia.

TEMPERATURE CONTROL:
Many other cultures see bananas as a 'cooling' fruit that can lower both the physical and emotional temperature of expectant mothers. In Thailand , for example, pregnant women eat bananas to ensure their baby is born with a cool temperature.

So, a banana really is a natural remedy for many ills. When you compare it to an apple, it has FOUR TIMES the protein, TWICE the carbohydrate, THREE TIMES the phosphorus, five times the vitamin A and iron, and twice the other vitamins and minerals.. It is also rich in potassium and is one of the best value foods around So maybe its time to change that well-known phrase so that we say, 'A BANANA a day keeps the doctor away!'

PS: Bananas must be the reason monkeys are so happy all the time

!Subscribe Here to get Daily Health Tips - http://mht.co.in/Subscribe-here
Read more »
0 comments

How to survive as a student - basic recipes

Interesting website. If I was staying alone overseas back then, I will probably love it to the core. Still love it.

Source: http://www.bbcgoodfood.com/howto/guide/how-survive-student-basic-recipes

Starting university this year? You've probably bought the books, packed your bags and even popped to Ikea for last minute essentials - but did you remember to learn to cook?
If your kitchen skills leave a lot to be desired then fear not, our favourite student basics will see you through your first term and beyond...

Minestrone soupMinestrone soup

Just before I was packed off to university my Mum insisted I learn at least one healthy recipe in an attempt to stave off vitamin deficiency and avoid a dedicated packet noodle existence. The recipe she chose was minestrone soup - packed with veg and energy boosting carbohydrates, a big batch of this cheap and speedy soup is freezer friendly and full of goodness. Thanks Mum!

Simple staple: Frozen veg means no chopping and gets a healthy and homely soup on the table in just 10 minutes:
Minestrone in minutes
Make it more interesting: This restaurant-standard French recipe is one to try when the folks are visiting - sure to impress:
Pistou soup

Gnocchi and tomato bakePasta bake

A classic student failsafe, pasta bake doesn't have to be the cheese-laden vision we imagine on hearing the words. Let storecupboard staples like pasta and tinned tomatoes be your base and then get creative with your favourite veg, herbs and try reduced-fat crème fraîche for a lovely texture with less of the stodge.
Simple staple: Full of the good stuff, this bake will be ready in a flash and is healthy to boot. Share with friends or freeze leftovers for easy mid-week meals:
Gnocchi & tomato bake
Make it more interesting: A make-ahead dish designed for entertaining, but won't cost a fortune - perfect Friday food for friends:
Baked rigatoni with aubergine & mozzarella

Baked beans with jacket potatoJacket potatoes

Jacket potatoes are a great speedy food when cooked in the microwave but taste their best when lovingly crisped up in the oven.
Simple staple: While baked beans count as one of your five a day, shop bought varieties often pack in the salt so making your own is a healthy and still cost effective way to reap the benefits of an old favourite:
Jacket potatoes with homemade baked beans
Make it more interesting: Fill new potatoes with soured cream and chives for a bite-sized snack or cute canapé:
Mini jacket potatoes

One-pan rice

With a bag of rice in the cupboard you're never more than 15 minutes from a satisfying and speedy supper. Make your grains brown or wholegrain for added health credentials.
Simple staple: Use up leftovers in this quick, fuss-free dish:
Fast-fix fried rice
Make it more interesting: This show-stopping supper serves 10 and is presented in hollowed out pumpkins - make all year round, but especially Halloween!
Pumpkin biryani

Roll your own fajitasFajitas

Whether feeding friends or whipping up a mid-week main, you can't go far wrong with fajitas. Add and swap ingredients to accommodate taste and budget.
Simple staple: slice, chop and serve - rolling your own fajitas is fun and a fast way to get dinner on the table:
Roll-your-own fajitas

Make it more interesting: With a little effort you can elevate the failsafe fajita to a Mexican masterpiece using cheap pork cuts, homemade mole sauce and a side of chunky salsa:
Pulled pork with Mexican almond mole sauce

Summer vegetable curryThai curry

Pack your store cupboard full of Thai spices, curry paste and coconut milk and you'll be ready to whip up a classic Asian curry, whatever the occasion.
Simple staple: Packed with goodness, this veggie feast should be a permanent fixture on all meal planners:
Summer vegetable curry
Make it more interesting: Up for a challenge? Roll up your sleeves and make your own authentic Thai curry paste to add to your favourite green curry:
Green curry paste

GranolaGranola

Don't forget breakfast! Make your own granola and add your favourite nuts, fruit and seeds to rolled oats. Store in a sealed container to help keep the crunch.
Simple staple: This recipe is sweetened with honey for a natural energy boost:
Crunchy granola with berries & cherries

Make it more interesting: Bake all the goodness of your granola into chewy breakfast bars - ideal when you need to enjoy breakfast on the go:
Cinnamon berry granola bars

Skinny pepper, tomato and ham omeletteOmelettes

Eggs are a cheap source of high quality protein and are also rich in vitamins and minerals. Whipping up an omelette for one couldn't be easier, making for a speedy lunch or satisfying solo supper.
Simple staple: You can't go wrong with classic ham & cheese - add tomatoes for extra health benefits:
Skinny pepper, tomato & ham omelette
Make it more interesting: Practice your soufflé skills with this fluffy and filling supper. Experiment with different fillings to find your favourite:
Cheese & ham souffléd omelette
Read more »
0 comments

Basic Biscuit Dough

Source: http://www.bbcgoodfood.com/recipes/3468/basic-biscuit-dough

Basic biscuit dough


Cooking time

Prep:5 minsCook:15 mins

Skill level

Easy

Servings

Makes about 30 cookies
This simple recipe for cookie dough can be adapted to suit your tastes- experiment with different shapes and flavours. 

Additional info

  • Freezable
  • Easily doubled / halved
  • Vegetarian

Ingredients

  • 250g butter, softened
  • 140g caster sugar
  • 1 egg yolk
  • 2 tsp vanilla extract
  • 300g plain flour

Method

  1. Mix 250g softened butter and 140g caster sugar in a large bowl with a wooden spoon, then add 1 egg yolk and 2 tsp vanilla extract and briefly beat to combine. Sift over 300g plain flour and stir until the mixture is well combined – you might need to get your hands in at the end to give everything a really good mix and press the dough together.

Tip 1

Triple chocolate treats - American-style biscuits

Heat oven to 180C/fan 160C/gas 4. Make a batch of Basic biscuit dough, substituting 50g cocoa powder for 50g plain flour. Add 85g white chocolate chunks and 85g milk chocolate chunks, then mix well. Scoop the mixture into 12 large balls onto a non-stick baking sheet. Space well apart, as they will spread. Flatten slightly, bake for 12-15 mins, then transfer the soft, warm cookies to a cooling rack to firm up.


Tip 2

Little lemony fingers

Heat oven to 180C/fan 160C/gas 4. Make the Basic biscuit dough, adding zest 2 lemons to the sugar and butter mixture. After chilling, roll out the dough to a rough rectangle, then use a pizza cutter or knife to divide the dough into long strips, about 10 x 2cm. Bake as above. For the icing, mix 140g sifted icing sugar with 4-5 tbsp lemon juice and the zest 1 lemon. When biscuits are cool, half dip them into the icing, then dry on a rack.

Tip 3

Crushed almond rounds

Prepare the Basic biscuit dough, substituting 2 tsp almond extract for the vanilla. Shape the dough into a large oval log, about 8-10cm in diameter, then roll in 100g finely chopped whole blanched almonds, pressing the nuts onto all sides. Carefully wrap in cling film, then chill or freeze. To cook, heat oven to 180C/fan 160C/gas 4, then slice off 1cm thick ovals with a sharp knife. Bake on a non-stick baking tray for 12 mins until pale gold, then transfer to a cooling rack to firm up.

Notes for baking biscuits: [Source: http://www.bbcgoodfood.com/technique/how-make-biscuits]

- The dough can be frozen for up to 6 weeks.
- Thaw for 1 hour or soft enough to slice into biscuits.

Points to remember

  • Rub the butter into the flour in a large bowl using the tips of your fingers.
  • Add the vanilla extract, egg yolks and sugar and mix to a dough with your hands.
  • Bring the dough together with your hands.
  • If you have a food processor, you can tip in the flour, add the chopped butter and pulse until the mixture looks like breadcrumbs. Add the sugar, vanilla and egg yolks and pulse again until it comes together in a dough.
  • Roll the dough on a lightly floured surface, forming a sausage shape. Wrap the dough in clingfilm and chill for at least 1 hour.
  • Preheat the oven to 180C/gas 4/fan 160˚C.Cut the dough into 5 mm thick slices, arrange them on greased baking sheets, spacing the biscuits so they have room to spread a little as they cook.
  • Bake for 20 minutes or until the biscuits are just turning golden around the edges.
  • Transfer to a wire rack to cool.
  • Dust generously with icing sugar.
  • The biscuits will keep fresh for up to one week stored in an airtight tin.


Read more »
0 comments

Easy Biscuits

Source: http://www.food.com/recipe/easy-biscuits-135930/photo


Servings:12


Ingredients:2 cups flour
3 teaspoons baking powder
2 tablespoons sugar
1 teaspoon salt
1/3 cup oil
2/3 cup milk


Directions:1. Mix dry ingredients.
2. Put oil in measuring cup and add milk. Do not stir.
3. Add to dry ingredients.
4. Mix lightly to moisten ingredients and knead one or two times to form ball.
5. Roll out between two sheets of plastic wrap to about 1/2" thick.
6. Cut into 2" biscuits.
7. Bake on an ungreased pan at 475F for 10-12 minutes, until lightly browned.
Read more »
0 comments

Simple Chocolate Cake with Icing

Source: http://www.bestrecipes.com.au/recipe/simple-chocolate-cake-L4994.html

Photo of Simple Chocolate Cake

Ingredients: 
1 cup self-raising flour
3 tablespoons cocoa powder
250g butter
1/2 cup caster sugar
1 teaspoon vanilla essence
2 eggs

Icing: 
1 cup icing sugar, sifted
1 teaspoon cocoa, sifted
Dash milk
2 teaspoons softened butter

Method: 
1. In a bowl, combine flour, cocoa, vanilla essense, and melted butter.
2. Add eggs and mix together for 1 minute.
3. Pour into a lined cake tin and bake for 25-35 minutes at 160C.
4. If the cake springs back, it's cooked. Do not overcook.
5. Icing: Mix together icing sugar, cocoa, milk and butter.
6. Ice cake once it has cooled.


Read more »
0 comments

Simple chocolate cake

Source: http://www.wikihow.com/Make-a-Simple-Chocolate-Cake


Ingredients

  • 2 tablespoons cocoa
  • 2 eggs
  • 1 cup self-rising flour
  • 1 cup sugar
  • 60g melted butter
  • 1/2 cup milk

Steps

  1. 1. Preheat oven to 180 degrees Celsius.
  2. 2. Place all ingredients in a bowl.
  3. 3. Beat with an electric beater until the mixture is smooth.
  4. Pour into grease and base lined (baking paper on the bottom) cake tin.
  5. Bake for approximately 40 minutes or until cooked when tested. Addfrosting, sprinkles, and any other sorts of decoration.

Tips

  • Beat for around 3 minutes. This is a fairly wet mixture and the beating is important. Beat through enough to make a smooth batter but not too much that the air is taken out.
  • Wash your hands.
  • The tin should be approximately 9x19cm tall (size doesn't even really matter).
  • Doesn't make too much batter.

Warnings

  • If the cake is still wet and/or moist when tested place back in the oven for another 5 - 10 minutes. Test by inserting a clean metal skewer into the centre of the cake and when the skewer is pulled out, it should be clean. If there is a sign of batter on the skewer, the cake is not fully cooked.

Things You'll Need

  • Bowl
  • Electric beater
  • Greased cake tin


Read more »

Search This Blog

Blog Archive