Search

.

Content

Showing posts with label Special Occasion: Chinese New Year. Show all posts
0 comments

Pineapple Jam

 Source: https://www.singaporeanmalaysianrecipes.com/pineapple-jam-kuih-tart/


Equipment: 

knife and chopping board

chopper/blender/grater

large bowl

large saucepan

ladle


Ingredients: 

4 ripe, medium pineapples

200 g white sugar

4 cloves

1 small cinnamon stick


Instructions: 

1. Peel the pineapples and place in a food processor and blitz until fine.

2. Place everything into a heavy based large saucepan.

3. Bring everything to boil, then simmer for about 2 hours, until cooked right down, stirring every so often, especially towards the end, as you don’t want it to burn.

4. You’ll end up with a thick jam, a dark honey brown in colour.


Total cooking time depends on the amount of pineapple you use as well as how juicy it is, and therefore how much liquid needs to be cooked off. Nutritional info is just for the jam, in 150 pineapple tarts.


I think the weight of 4 medium pineapples BEFORE PEELING is about 3.5 – 4 kg.


Read more »
0 comments

Coconut love letters (kuih kapit)

 Source: https://www.sbs.com.au/food/recipes/coconut-love-letters-kuih-kapit


Ingredients: 

3 large eggs

200 gm caster sugar

30 gm tapioca flour

150 grice flour, sifted

60 g(½ cup) plain flour, sifted

250 ml(1 cup) coconut cream

120 ml water


Insturctions: 

Resting time 1 hour


Whisk the eggs and sugar in a bowl until well combined. Add the flours and whisk to combine, then add the coconut cream and whisk until a smooth batter forms. Whisk in the water until well combined. Strain the batter through a fine mesh sieve and leave to rest for 1 hour.


Preheat the krumkake or pizzelle maker according to the manufacturer’s instructions. Set the colour setting to number 3. Scoop 2 tablespoons of the batter onto the mould, then cover and cook for 1 minute or until they are golden. Remove the biscuit and quickly fold in half then in half again, then press down lightly and set aside to cool. Repeat with the remaining batter. Store in an airtight container.


Note


• I used an electric love letter machine, and only added 1 tablespoon of the batter for each love letter.


• The electric love letter machines can be found at some Chinese, Singaporean or Malaysian specialty stores and are most likely to be purchased online. If you are unable to source one, a pizzelle maker or a flat-waffle-iron will do the trick. 


Cook's notes

Oven temperatures are for conventional; if using fan-forced (convection), reduce the temperature by 20˚C. | We use Australian tablespoons and cups: 1 teaspoon equals 5 ml; 1 tablespoon equals 20 ml; 1 cup equals 250 ml. | All herbs are fresh (unless specified) and cups are lightly packed. | All vegetables are medium size and peeled, unless specified. | All eggs are 55-60 g, unless specified.

Read more »
0 comments

Pineapple Tart

 Source: https://www.singaporeanmalaysianrecipes.com/pineapple-tarts-recipe-resepi-kuih-tart/


Ingredients: 

700 g plain flour

1 large egg

1 Tbsp condensed milk at room temperature

400-500 g salted butter, at room temperature (14 oz – 17.5 oz)

1 portion pineapple jam

a bowl with extra plain flour for dusting

Eggless Pineapple Tarts

700 g plain flour

¼ tsp baking powder

70 g condensed milk, at room temperature

1 Tbsp condensed milk, at room temperature PLUS this amount too

400-450 g salted butter, at room temperature (14 oz – 1 lb)

1 portion pineapple jam

a bowl with extra plain flour for dusting


Instructions: 

Making Pineapple Tarts Pastry

  • Sift the flour.
  • Whisk the egg and condensed milk with a wooden spoon until combined.
  • Add 400g (14oz) of the butter and mix in as much as is possible. You will most likely not get a smooth mix, and that's perfectly fine. The only way to get it smooth is with an electric mixer which we are not using here, as you will end up with a dough that's way too soft. It will get smooth as we add the flour.
  • Add the sifted flour and mix it in by using cutting motions with your spoon (or pastry cutter), i.e., north-south, east-west. If your dough feels too dry and crumbly, add more butter, bit by bit, but remember, we want to be gentle and not knead the dough. Just use your fingertips, see the video.
    You will probably not need all the butter.
  • Now, using your fingers, bring it all together lightly, do not knead.
  • Wrap in cling film and place in the fridge for 10 minutes, no longer as the dough will be too brittle.

Rolling, Cutting and Filling Pineapple Tarts

  • On a floured surface, roll the dough out to a depth of about ½ cm (⅕ in). Remember to place cling film on the dough before rolling.
  • Dust a small amount of flour on the surface of your pastry and very lightly spread it out with your fingers. This will aid in the pastry not sticking to the cutter.
  • Using your cutter, cut out shapes (dip in flour!) and place on cookie sheet. If your oven takes 2 trays at once, fill 2 cookie sheets.
  • Preheat oven to 160˚C/310˚F (Fan 140°C).
  • Fill the tart shells with jam, being careful not to overfill them. To me, they look rather unsightly when the jam is bulging out almost like a ball. Place the dough back in the fridge while filling the cut out tarts.

Bake ’em, Dano

  • Bake the pineapple tarts for 15-18 minutes until a pale golden colour, not brown. We are going for a beige look!
    If your oven runs cool, you may need more time, the full 18 minutes. One of my readers had to cook hers for 22 minutes each tray because her tarts were just not browning!
    Also, the thicker your tarts, the more time you will need.
    And, if baking 2 trays at a time, the one on the lower shelf will probably need 2-3 minutes more.
  • Repeat the whole rolling, cutting and filling with the rest of the pastry.
  • When cool, store in an airtight container at room temperature, every layer lined with baking/parchment paper to prevent sticking. They will keep for 2-3 weeks easily, that is, if they don’t get eaten up first!

Eggless Pineapple Tarts

  • Sift the flour and baking powder.
  • Beat the butter with a wooden spoon for 30 seconds.
  • Add all the condensed milk and mix thoroughly with the wooden spoon.
  • Follow the rest of the recipe as above and bake for and additional 3-5 minutes until you get a very light brown golden colour. The reason for the extra cooking time is because they are eggless, they tend to get softer as the days go by, so I like to give them a good crisp start.


Read more »
0 comments

Kuih Bangkit

 Source: https://whattocooktoday.com/kue-bangkit-santan.html


Ingredients: 

250 gm pre-cooked tapioca flour/starch Get at least 350 gr

5 pandan leaves cut into 3-4 inch pieces

100 ml coconut cream plus more as needed. Do not shake the can. See notes

1 egg yolk

90 gm icing sugar

⅛ tsp salt optional, it does bring out flavor of the cookie

Red coloring optional


Instructions: 

Get the coconut cream:

It's important not to shake the canned coconut cream. You can also chill the coconut cream in the fridge to help separate the cream from the water. I scoop up the cream on top. The watery bottom can be saved for other use in other recipes

Cook the tapioca flour (you can prepare few days ahead):


If you want to use the stir-fry method: Stir fry the flour with pandan leaves over low-medium heat on a dry wok without oil for about 1 hour. The flour will get lighter and lighter as you cook them. Remove the pandan leaves. Shake off any excess that clings on the leaves. Let them cool down completely and then store in an air-tight container until the next day if not using on the same day

Baking method (highly recommend): place the flour in a pan lined with some parchment paper.Bake at 300 F for 2 hours. Stir it twice halfway

Whether you are doing the stir-frying or baking the tapioca flour, the weight of the flour should be decreased by 13-14%, indicating your flour is "dry" enough now to be used for kueh bangkit. So if you bake 350 grams, it should be about 300 grams or close to that when it's done baking

Making the dough (Very important part, please read my post above too!):

Let the tapioca starch cools down in the oven so it won't collect any moisture. Then store it in an air-tight container for up to 7 days. I recommend using it the next day

Place the eggs yolk and icing sugar in a mixing bowl and whisk with an electric mixer starting at low speed and then gradually increase to medium high speed until the mixture is creamy and turns slightly pale yellow in color, about 3 minutes


Sift in the tapioca starch into the egg yolk mixture. Don't shake the sifter as the tapioca starch will fly everywhere. Use a rubber spatula to help you sift the starch. Use a rubber spatula to gently mix it. It won't come together yet. Add about 70 ml of the coconut cream first and then knead the dough with your clean hand. Most likely it will still be too dry to come together, add a bit more, tablespoon by tablespoon and continue to knead. Do this until you come to the point when you get a dry hard dough that is not smooth. I ended up using about 90 ml of coconut cream total (but please don't add all at one go). You may need a bit more or a bit less

Test the teexture and consistency of the dough:

Pinch off a small amount and press the dough with your hand. It will hold and you can divide it into half but when you press the dough with your fingers, it will crumble. This is the consistency we want to get that melt-in-mouth texture.

Shaping:

Preheat oven at 300 F / 150 C (I updated this since some of you need to bake for a long time). I have a conventional oven (with heating elements at the bottom). Dust the baking sheets (I use an aluminum pan for best heat transfer) with some extra tapioca starch to prevent sticking. I find this works better than lining the pan with parchment paper. Dust the cookie mould with the extra cooked tapioca flour you made earlier. Shake off excess flour


Pinch off one dough and press it firmly into the mould. Keeping the rest of the dough covered. Use a sharp paring knife to trim off excess dough on the top. I found that I don't need to dust the mould much because mine is made of plastic. Flip the mould over and firmly tap the mould to release the shaped dough. You shouldn't have difficulty if the mould is nicely coated with flour. Place them on the baking sheet, about 1/2 inch apart. The cookies do not expand much at all. Repeat with the rest of the dough

If the dough gets dry as you are working on shaping the cookies, you can add a bit of the extra coconut cream you have earlier and mix it again to make the dough less dry, but I don't have to do this

Baking (see my post above for more details with type of oven and baking temperature):

My oven uses bottom heat only. See the above post under "baking temperature" if your oven is different. Place them inside the oven 3rd rack from the top (or middle of the oven) and bake for 15 minutes (for 5 gr cookies). The bottom should be lightly golden brown and the top is pale white

Dot with red food coloring (optional):

Use a toothpick and dot the tip of the toothpick on red food coloring and dot on top of the cookie. This is totally optional

Storing:


Store in an air-tight container once they've cooled down completely and they will last for 1 month at room temperature. It tastes the best the first week you made them


Read more »
0 comments

Kuih Bahulu

 Source: https://www.nyonyacooking.com/recipes/kuih-bahulu~rJTWOwsPM9W7


Ingredients: 

150 g     all-purpose flour

180 g    sugar

5            egg(s)

1⁄4 tsp    baking powder

—        oil


Instructions: 

1. 150 g all-purpose flour

Bake sifted flour in a preheated oven at 220 degrees Celsius for 3-5 minutes.


  • 2. 180 g sugar
  • 5 egg(s)
  • 1⁄4 tsp baking powder
  • Heat sugar and remove once it begins to melt. Then, pour sugar into eggs and mix well. Start with the lowest speed and increase speed gradually. Optionally, add vanilla paste to the batter. Add baking powder to flour and fold into the batter.


    3. oil

    Heat mould with oil for at least 5 minutes at 200 degrees Celcius. Remove oil from the heated mould. Pour batter into it and bake for 8-10 minutes or until golden brown. Remove kuih bahulu and brush oil into the mould before proceeding with the rest of the batter. Allow kuih bahulu to cool before storing them.

    Read more »
    0 comments

    Low Carb Bak Kwa

     Low Carb Bak Kwa 

    Source: https://nomnomprincess.com/2018/02/12/low-carb-bak-kwa/

    Servings: 18 pieces

    Time: 1 hour


    Ingredients

    • 1 kg pork (I usually get this at the butcher’s and ask for more fatty meat and only minced once)
    • 1 cup sweetener (I used Monkfruit sweetener)
    • 2 tbsp dark soy sauce
    • 2 tbsp Chinese wine (hwa tiao chiew)
    • 2 tsp sesame oil
    • 2 tsp fish sauce
    • 1/2 tsp five spice powder
    • 1/2 tsp ground white pepper

    Instructions:

    1. Mix the dark soy sauce, chinese wine, sesame oil, fish sauce, pepper and five spice powder together. Mix together with the sweetener, then mix through the pork mince well. Refrigerate for at least 4 hours to overnight.
    2. Turn the oven on at 150 deg C.
    3. Line a baking tray with baking paper or a silicone mat.
    4. Cut out 2 pieces of baking paper that fits the size of the baking tray. Place about 1/3 of the pork mince in between 2 pieces of baking paper and roll out carefully to be about 1/2 cm thick in a rectangular shape.
    5. Place the pork mince on baking paper into the baking pan. Peel off the top layer of baking paper. Repeat #4 and #5 with another 2 trays.
    6. Place a tray of pork mince into the oven for 20 minutes, then remove. Repeat the same for the other trays.
    7. With kitchen towels, dab away any liquid that may have oozed from the meat. Then, with a pizza cutter or a knife, slice the large piece of ground meat into 6 pieces. Gently separate the pieces of meat so that there is a little space between them.
    8. Bring oven temperature up to 225 deg C, then place the baking tray into the oven for 5 minutes. Remove the tray and flip over the pieces of meat. Bake again for another 5 minutes.
    9. Finally flip over again. Bake for the last 2 minutes and be very careful at these stage where the meat is most likely to burn (different ovens may have different roasting effects).
    10. Remove and set on a rack to dry out a little and cool down. Keep in an airtight container or eat immediately.
    Read more »
    0 comments

    Ngor Hiang

    Ngor Hiang (makes 10)

    Ingredients:
    1kg minced pork (approx $6.50)
    1 onion (approx $0.20)
    1 carrot  (approx $0.20)
    1/2 can water chestnut (567gm can) $2
    1 or 2 piece of black fungus (optional)
    Spring onion (optional)

    Seasoning: (approx $1)
    1 tablespoon five spice powder
    2 tablespoon salt
    4 tablespoon sugar
    1 tablespoon sesame oil
    1 tablespoon chicken stock
    4 tablespoon plain flour

    Beancurd Skin ($1.70 per pack) each pack makes 6

    2 packets required

    Read more »
    0 comments

    Mini Prawn Rolls 2

    Source: http://adel-icious.blogspot.sg/2012/06/spicy-dried-shrimp-aka-hay-bee-hiam.html

    Spicy Dried Shrimp
     200g     Dried Shrimp (weight is before soaking)
       20g     Garlic, minced (about 5-6 cloves)
     200g     Chilli Paste
    Salt & Sugar to taste

    Doesn't matter if the chilli paste is home made or store bought although there's always greater control in home made items. Some recipes call it "Sambal", works for me but if you're unfamiliar with it, it's just a chilli paste.

    1. Soak the Dried Shrimps for about 20-30 minutes, dry the shrimps as much as you can and have it coarsely minced for chunky style so you will get the occasional burst of shrimpy goodness when eating.
    2.  Heat a tablespoon of oil over Medium heat and sautéed garlic till fragrant. Add in the minced shrimp and continue frying till the whole kitchen is filled with the aroma of fried shrimp. The minced shrimp will shrivel slightly and darken in colour. Another tell-tale sign is that some of the smaller pieces will start jumping about the wok.

    3. Add in the Chilli Paste, mix with the minced shrimp and keep the mixture moving constantly to prevent burning (I burnt mine a little as I tried to take pictures... -.-). Season to taste. Like every other time, the chilli will assault your eyes and nose. Keep your kitchen well-ventilated at this stage. Heat off when most moisture has been removed.

    4. Cool completely before storing in a sterilized container.

    Spicy Dried Shrimp Rolls (makes about 40 mini rolls)
    200g     Spicy Dried Shrimps
       5       Spring Roll Skin, each cut into 9 squares
       1       Egg, lightly beaten 
    1. Place a small amount of Spicy Dried Shrimps in the center of a small spring roll skin. Fold the bottom -> right -> left corners toward the center. Dab a little egg wash in the middle and the last corner before completing the roll.
    2. Deep fry in Medium heat oil till golden brown OR "fry" them in an Air Fryer at 180º C for 10 minutes, checking and shaking the basket halfway. 


    Read more »
    0 comments

    Mini Prawns Rolls

    Source: http://tamarindandthyme.wordpress.com/2010/02/06/mini-spicy-shrimp-rolls/

    Mini Spicy Shrimp Rolls

    Mini Spicy Shrimp Rolls
    makes 150-200.
    100g dried shrimp
    8 large dried chilies
    5 shallots
    4 cloves garlic
    3 tbsps sunflower oil
    1-1.5 tsp salt, to taste
    1-1.5 tbsp sugar, to taste
    1 packet of large, square spring roll wrappers (I didn’t use the largest ones; I used the next largest that come 40 to a pack, Spring Home brand)
    1 egg, beaten
    sunflower oil for frying
    Soak the dried shrimps in cold water for 15 minutes. Place into a mini chopper or food processor and process until finely chopped. Set aside.
    Peel the shallots and chop finely (I used my mini chopper). Set aside. Peel the garlic cloves and chop finely too.
    Soak the dried chilies in warm water until soft. Cut into large pieces, discarding the seeds, and blend with a little water until a paste is formed.
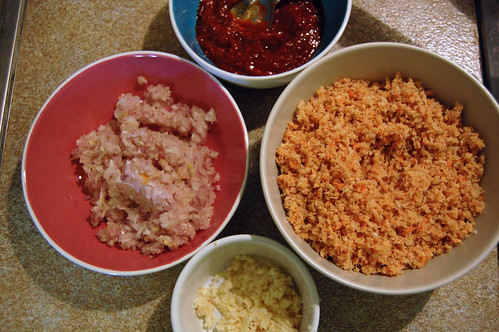
    Ingredients for the Filling
    Heat a frying pan over medium heat and when hot, add the 3 tbsps sunflower oil. Fry the chopped shallots for a few minutes until soft. Add the garlic and fry until it’s fragrant. Stir through the chili paste, letting it cook until much of the liquid has dried up. Add all the processed dried shrimp and continue frying, stirring continuously until the mixture goes quite dry and dark. I didn’t time how long this took but I was frying there for at least 10-15 minutes or so, I think. When done, set it aside and let it cool.
    If your spring roll wrappers were frozen, defrost them. Separate them carefully and cut each wrapper into 9 smaller squares. Stack these smaller squares to prevent them from drying out.
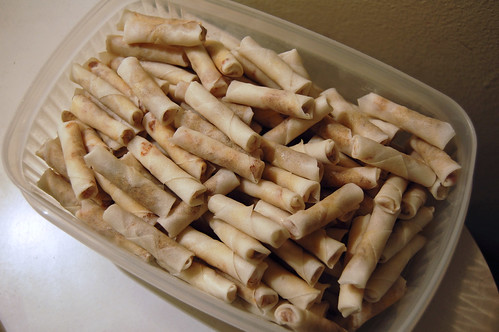
    Now to wrap them! You might want to get comfortable for this; I was wrapping for a few hours. Place a little less than a teaspoonful of the shrimp mixture on the wrapper and wrap as you would a regular spring roll. (Sorry, no photos of this process but this postillustrates the steps quite nicely). Use a tiny dab of beaten egg at the final point to seal the roll. Repeat until you’re out of wrappers or out of filling (that was me) or out of patience.
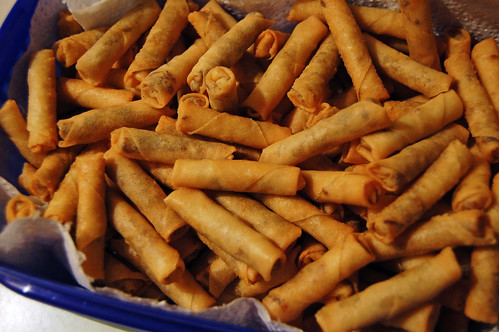
    All Wrapped
    To fry them, heat about 2 cm of sunflower oil in a pot or pan on medium-high heat. When you add a roll, the oil should bubble up around it. Fry for about 2 minutes until the roll is golden. Drain well on kitchen paper. Fry all the rolls in not too large batches (don’t want that oil to cool down).
    Frying
    Make sure the rolls have cooled fully before packing them in an airtight container.


    Read more »
    0 comments

    Pineapple Tart

    Source: http://munchministry.com/recipe/open-face-pineapple-tart/


    340g plain flour
    ½ tsp salt
    1 tbsp icing sugar
    250g butter, cubed
    1 egg yolk
    25ml cold water
    ½ tsp vanilla essence
    1 beaten egg, glazing
    Method:
    1. Sift flour, salt and mix sugar into a mixing bowl.
    2. Rub in butter till mixture resembles breadcrumbs.
    3. Beat in the egg yolk and add cold water and essence. Mix well to form a dough.
    4. Place in plastic bag and chill for 30 mins.
    5. Roll pastry out on a lightly floured table top and cut out with tart cutters.
    6. Fill each piece with the pineapple jam.
    7. Glaze with beaten egg.
    8. Bake at 180 ºC for 15 mins.
    -------------------------------------------------------------------------------------------------------

    Another source: Auntie Anna

    Pineapple Jam : 
    12 very green pineapples and 3 ripe pineapples, 1kg rock sugar, 3 star and 2 cinamon stick. 

    Method: manually grate the pineapple. drain the pineapple and keep the juice. Cook the pineapple over low fire., adding the juice bit by bit till all the juice has been used up. Not to forget to add in the spices and rock sugar. It took me at least 8 hours to cook the jam (15 pineapple) stirring non stop.


    PASTRY: 
    Butter salted 220g, caster sugar 20 g , vanilla 1 tsp, 1 large egg yolk, 20g full cream milk powder, 20g custard powder, 130g plain flour, 130g top flour.

    Method : cream butter, sugar and vanilla until soft and light. Add egg yolk, followed by other ingredients, Use hand to knead lightly into dough. Rest at least half hour before used.

    If no top flour, use plain flour. Makes ~ 200 tarts 
    -------------------------------------------------------------------------------------------------------

    Another Source: http://foodismylife.wordpress.com/2012/01/15/chinese-new-year-2012-pineapple-tarts/


    Pineapple Tarts (makes about 160 – 165 tarts)
    1 kilogram pineapple filling / jam
    800 grams all-purpose flour (plain flour)
    1/2 teaspoon salt
    4 tablespoons corn flour (corn starch)
    125 grams icing sugar
    500 grams best quality unsalted butter, at room temperature
    4 large egg yolks (75 – 80 grams) + 2 egg yolks (for egg wash)
    Divide the pineapple filling – a teaspoon or approximately 6 grams each. Roll into a ball then roll into a small log shape. If the jam becomes too sticky and hard to handle, dip your fingertips in water and continue – it’ll be easier to handle after that. Chill the rolled pineapple balls.
    Sift the plain flour, salt, corn flour and icing sugar in a clean bowl.
    Place the unsalted butter in another bowl. Using an electric mixer, cream the mixture for 30 seconds on low speed and turn the speed up to medium-high and cream for 5 minutes, scraping the sides occasionally until the butter is light, creamy, fluffy and pale in colour.
    Beat the 4 egg yolks in a small bowl. While the electric mixer is running on low, drizzle in the beaten egg yolks. Turn up the speed to medium and cream until the egg yolks has been fully incorporated into the butter.
    Using a huge rubber spatula or metal spoon, fold in the flour mixture in two batches gently until just incorporated. Do not over-mix or over work the dough – otherwise you will lose the melt-in-the-mouth texture.
    Lay a large piece of clingfilm / plastic wrap on the table. Turn the dough out onto the plastic wrap and wrap it up. Chill in the refrigerator for 30 minutes.
    Preheat the oven to 180 degrees Celsius. Combine the two egg yolks (reserved for egg wash) with 1 – 2 teaspoon of water / milk until it’s a smooth consistency. Set aside.
    Line a baking sheet (or several baking sheets if you have a small oven like me) with baking paper. Set aside. Prepare a small dish with water.
    Divide the chilled dough – 1 heaping teaspoon or approximately 10 – 12 grams each. Roll them into rounds and flatten them. Dip the chilled pineapple ball into a little bit of water (enough to moisten the outside of the pineapple ball but not drench them). This will keep the pineapple filling moist and not dry out while baking. Place the pineapple ball in the middle of the flattened dough and enclose it. Shape it into a log / desired shape and place it on the lined baking sheet.
    Brush the top of the pineapple tarts with a layer of egg wash and bake for 15 minutes. Brush with a second layer of egg wash (if needed) and bake for another 5 minutes, until the top is golden brown in colour.
    Cool the tarts completely and store them in an airtight container.
    Notes:
    • If you don’t like sweet pineapple filling or want them to have a tangy taste, mix in several teaspoons of lemon juice into the pineapple filling before rolling them into balls.
    • You may wind up with extra pineapple jam, just snack on them!
    • Use the best quality butter for a rich, sinful, buttery taste.
    • This is not a low-fat snack… so watch your waist line while you indulge in them!


    Read more »
    0 comments

    Bak Kwa

    Source: http://munchministry.com/recipe/grilled-bak-kwa-%E8%82%89%E5%B9%B2/


    Ingredients
    1 kg ground pork
    Marinate:
    1 1/2 tbsp fish sauce
    1 1/2 tbsp soya sauce
    175 – 200 gm sugar
    1/8 tsp 5 spiced powder
    1/2 tsp cinnamon powder
    1/2 tsp kam cho(licorice) powder *
    1/2 tsp white pepper
    1 tsp msg (optional)
    1 tbsp oil
    2 tbsp rose wine *
    a big drop of red food coloring *


    Method:
    1. Season ground pork with the marinate and leave in the fridge overnight or at least 4 hours
    2. Sandwich the meat mixture with 2 pieces of baking paper
    3. Roll to the thickness you like, remove top piece of the baking paper
    4. Place the rolled meat mixture (do not remove the bottom piece of baking paper) into HCP, cover pan
    and cook it for 1 to 2 mins
    5. When you see the meat mixture is almost cooked (meat are not separated), slide the meat from the
    baking paper and continue to cook in the HCP.
    6. Flip and grill (low-mid fire) the meat consistently till you get a nice glossy, juicy looking bak kwa


    Additional Comments About this Recipe:
    * Iomitted kam cho (licorice) powder
    *Replaced rose wine with hua tiao wine
    *Red wine dreg 红糟instead of red coloring


    ---------------------------------------------------------------------------------------------------------
    Another source: http://www.mykitchensnippets.com/2011/01/bak-kuachinese-pork-jerky.html

    Ingredients
    2 pounds ground pork –with a bit of fat on it
    2 tbsp fish sauce
    3 tbsp soy sauce
    1 tsp dark soy sauce
    2 tbsp Chinese cooking wine
    3/4 cup sugar
    3 tbsp dark brown sugar
    Juice of half orange (about 4 tbsp)
    Zest of one orange


    Method: 
    1. Line 2 baking pan with heavy aluminum foil and set it aside.
    2. Put all the ingredients in a large mixing bowl. Using a big spoon mix it really well. Cover with plastic wrap and let it marinate in the fridge for an hour.
    3. Pre-heat the oven to 220 degree F. Spread the marinate meat thinly onto the baking sheets. Use a spatula or the back of the spoon to do this and dipping it in water occasionally. This way it will prevent the meat from sticking to the spoon or spatula. 
    4. Place the baking pan in the oven and let it bake slowly for 15-20 minutes. At this stage you can see juices appear, the meat will shrink and the edges dry out. 
    5. Remove from oven and cool it down a bit and cut it into square with pizza cutter or scissors. Turn the oven to broil.
    6. Line the cut meat back on the tray. Broil the meat on both side until brown and sizzle . This will only take 5-6 minutes (you have to watch this as it turn dark pretty fast)
    7. Let it cool and keep it in an air-tight container. 


    --------------------------------------------------------------------------------------------------------
    Another source: http://www.noobcook.com/bak-kwa/

    Ingredients: 

    • 200 grams minced pork
    • 1/2 tbsp fish sauce
    • 1/2 tsp sesame oil
    • 1/2 tbsp 5-spice powder
    • 1/2 tsp light soy sauce
    • 1/2 tsp dark soy sauce
    • 1 tsp Chinese wine Hua Tiao/Shao Hsing
    • dashes of white pepper powder
    • 2 tbsp caster (castor) or super fine sugar
    • 1/2 tsp knorr ikan bilis seasoning powder double light soy sauce if not using
    • 1/8 tsp red food colouring I use Bake King Cochineal Red/Cherry Red
    • vegetable oil


    Method: 


    1. Combine minced pork and seasonings in a deep plate. Mix the ingredients (except vegetable oil) with the back of a spoon in a circular motion, until the red hue is even; this will take several minutes. The resultant mixture will have a gluey consistency. Wrap plate with cling wrap and refrigerate for a few hours.
    2. Place parchment paper on a flat surface and spread the meat mixture one layer as thin as possible (about 5mm) with the back of a spoon.
    3. Brush the wire mesh with some vegetable oil. Align the wire mesh directly over the meat mixture, invert it, then carefully peel away the parchment paper.
    4. Place the wire mesh with the meat mixture on top of an oven wire-rack with a tray beneath it. Bake the bak kwa at preheated oven of 100°C for 20 minutes to dry the meat.
    5. Increase the oven heat to 180°C and bake for 12 minutes.
    6. When cool enough to handle, remove wire rack and transfer bak kwa to chopping board. Use a pizza cutter or pair of kitchen scissors to cut bak kwa to desired shapes and sizes.
    7. Return bak kwa pieces to wire rack, the other side up (the side with the wire grill lines), and continue baking at 180°C for 10-15 minutes, until the edges start to char slightly. Cool on wire rack and store in air-tight container.
    --------------------------------------------------------------------------------------------------------------------------------
    Another source: http://www.justasdelish.com/homemade-bak-kwa-dried-meat/

    Author: 
    Recipe type: Snack
    Serves: about 900g Bak Kwa

    Prep time
    Cook time
    Total time


    • 1kg fatty Meat Mince – either Chicken, Beef or Pork (Fattier mince makes more tender, juicy bak kwa)
    • 120g Caster Sugar
    • 2 teaspoon Chinese Five Spice Powder
    • 3 tablespoon Fish Sauce
    • 4 tablespoon Light Soy Sauce
    • 3 tablespoon Rice Wine (Shao Tsing / Chinese rice wine)
    • 3 tablespoon Honey
    • 15ml Vegetable Oil
    • ½ tablespoon Dark Soy Sauce
    • A few drops of Sesame Oil
    • Red food colouring – optional (I did not use)


    1. Thorughly combine all the ingredients in a large mixing bowl or container. Add red food colouring, if you prefer dark red shade. Cover and marinate overnight in the fridge.
    2. Preheat oven to 100°C. Wash and dry flat baking trays. If you don’t have any, simply turn over your baking trays to use the flat bottom. I use wooden cake boards and wrap with aluminium foil.
    3. Place mince onto the tray then spread and press down to form a thin sheet over the surface of the tray to a thickness of 3-5mm. You can either use wet fingers/spoon to manually press it or you could lay a sheet of plastic or baking paper over it and roll it thin with a rolling pin. Try to keep the edges as straight as you can so you can cut into neat squares. 
    4. Place the trays in the oven for about 20 minutes or until the meat has dried out – the surface is dry to the touch, most of the liquid has evaporated and is holding together without breaking (It’s fine to be a little moist underneath the sheet). Continue pressing and drying out the remainder of pork with the rest of your trays.
    5. Cut the dried meat sheet into squares with a kitchen scissors.
    6. Heat up your charcoal bbq, grill or broiler and grill each square until darkened and caramelised. It’s totally ok to have the tiniest hint of charring but keep your eyes on them because they burn quickly and easily.
    7. These Bak Kwa does not have preservatives, so it’s better to keep them in an airtight container in the fridge with sheets of greaseproof baking paper between each slice of Bak Kwa. When needed, reheat Bak Kwa in grill or microwave.
    Notes
    * Oven toaster can be used in place of the grill. * You can also store and freeze the bak kwa after you have dried it out in the oven. Once cooled, place sheets of greaseproof baking paper between each slice of pork. Wrap very well with clingwrap and place in a container to freeze. When ready to use, defrost in refrigerator and grill as normal.   


    Read more »